How To Build A Large Outdoor Staircase
- Outdoor DIY Projects
- April Wilkerson
- Updated: March 5, 2023
Do you want to know how to build an outdoor staircase? Here’s a detailed tutorial on building one that will walk you through all of the steps!
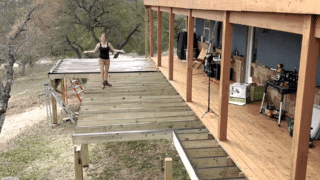
What a job this has been! I have been looking at my ugly staircase for too long! This week I take you along as I go through all of the steps required to take down my unsightly and unsafe staircase and replace it with a custom outdoor staircase. Although your staircase job may not be as large as mine, or even if it is larger, the methods of construction are pretty much the same across the board. Also, I’ll be sure to provide you with some really good learning resources below that I used to line me out on my building approach.
Impact Drill
20v Drill
Ear Plugs
High Lift Jack
Post Brackets
Hammer
Post Level
60 Gallon Compressor
Sawzall
SuperJaws
Circular Saw
Multi Stand
Palm Sander
Building Staircase Book
I’ll go ahead and say it, the demo for this project was by far the easiest portion of the entire build. I suppose that is the one good thing about the original builder doing a shotty job; it’s easy to tear down. Lol.

I basically took my time and slowly disassembled the structure with a sawz-all and a really big hammer. I started at the top of the landing and slowly tore it apart as I worked toward the bottom. A lot of the wood was very dry rotted and came loose pretty easily.
I was able to remove all of the post that were in concrete with a high light jack. I found this way was much easier than any other Ive seen people use such as a truck, straps, or simply digging them up. I attached a small block on the side of the post then placed the jack under the block and slowly jacked the post out of the ground. Super easy!


With all of the old structure out of the way I could begin to visualize the new stair case in place. I began the build by setting the four main posts in place for the landing. I chose 4x4x10’ treated posts and used some Swanson brand post brackets to attach the posts to the concrete. I decided to leave the posts long and cut them to length at later point.


I used the building foundation as the reference for setting all of the posts and double checked for square by measuring the diagonal in each direction across the square foot print. Once I had it all mapped out and nice and square, I used concrete anchors to set the post mounts.

I had to use some temporary bracing to hold the post nice and plumb until all of the permanent bracing got installed. I started with the posts closest to the building. Rater than have a bunch of screw holes from bracing in the siding of the barn, I attached a 2×6 with only 2 screws in it for all of the temp bracing to attach to. You can see in the picture how the short 2×4 braces attach to the 2×6 and not the building. Again, these are only temporarily holding the post plumb.


The remaining two posts were then braced to the first two using a bit longer lumber. I cut the posts to their exact height after the posts were temporarily braced. I could have cut them on the ground but doing it this way enables me to check for level between each post when referencing each cut line. After it was all double checked and the cut line were level relative to one another, I cut the top off each post with a long bladed saws-all.

Moving up to the top of the posts, I installed a header on all four sides. I used 2×8 treated material here and attached it to the post using ½-13 galvanized carriage bolts. I used two bolts at each connection point and made sure that each set of bolts are laid out exactly the same. When bolting through 2 adjacent sides of the post, you have to offset the pattern by a little bit so the bolts can pass over each other.

This material is not light. Consequently, my husband helped out to get this stuff in position while I operated the drill and ran the bolts in. When it comes to torquing the bolts down, I like to torque them until the head of the carriage bolt is sunken into the wood grain pretty good. The flat washer will do the same thing. You want these bolts to be good and tight so they do not back out.
The cross bracing fought me a little bit because the material is pretty heavy and it has to be lifted up to the structure multiple times before it was finally installed. Like everything else, there are a handful of different ways to build out the cross bracing. I wanted all of my bracing to be on the inside of the posts and to have a half lap joint at the intersection of the “X’s”

To begin marking my cut lines, I fed in a 2×8 to the top corner of the starting post and clamped it in position. Then I rotated the opposite end of the board until it crossed the second post at a mark I had already made which represented the bottom of my cross brace. After it was clamped in both locations, I traced the cut line onto the brace, took it down, and made the cuts with a circular saw.
Unfortunately the board does not get permanently installed yet..lol. I temporarily installed it with a couple of nails so that I could repeat the same process as before but with another board that makes up the second portion of the “X”. Afterward, the second board gets cut to length and they both get a small half lap “notch” sawed out of both of them.

The half lap was cut in using the circular saw to make several tightly spaced cuts and then came back with my hammer and knocked out the board material. After the material is beat out of the way, I used a chisel to smooth out the rest of the small remaining pieces. After a test fit of the two boards, I permanently attached them to one another.

It is best to use heavy duty construction adhesive at the joint just as a reinforcement. To secure the boards together I used 5 exterior torque screws. Looking back on it, I would have rather used a few through bolts and nuts but these screws will work just fine.
These cross braces went in just like the header – carriage bolts, nuts, and washers. The 20v impact driver I have made pretty short work of installing the bolts. However getting these heavy suckers in place was just regular ‘ol hard work.…man were these things heavy : )

Last point on cross braces: I specifically cut mine to the length you see here while keeping in mind a future build concerning the bottom of this structure. As you can see, I have an air compress that sleeps on the same concrete foundation as the stair case structure and I need to keep access to the compressor open. Without getting into the engineering trenches of how long and where the cross braces should be, I’ll suffice to say you have some freedom here if you’re repeating this build and encourage you to do what is best for your particular application while staying safe.
After finishing all of the bracing, I took down the temporary braces and re-checked plumb on my posts. Fortunately, they did not move at all and I could focus my efforts on the decking.
As I crawled up the ladder with my decking material in tow I realized a pretty important detail had been slightly overlooked. I needed a middle floor joist! I kept it simple here and just used another 2×8 board and attached it to the insides of the header boards with a joist hanger.

The decking was a very simple part of this build. Since the top of the structure is just over 45 inches, I sourced a 1x6x8’ for the decking, cut them to 48”, and then secured them with a slight overhang on the building side. The fence side of the decking was set flush to the edge of the outside header board.

I used exterior deck screws with the torque heads for all of the decking. Again, this is one of those times where it pays off to keep all of the screws evenly spaced and in line with one another. Unfortunately the very last piece of decking had to be ripped down the length since the floor width did not divide up evenly. To keep the spacing the same between each board I simply used a piece of ¼” material.

While I was up here I figured I might as well put in the posts for the handrail that will later wrap around the upper landing. There are a total of three posts on the top of the deck that support the handrail. Again, there are several ways one can go about making the handrail
I chose to cut out a notch on the halfway point of the depth of each post, rested the notch on the deck of the landing, then bolted the remaining half to the header material using ½” lag bolts and washers. The corner was slightly different since it needed to have the same amount of overlap as the other two but in two direction (because it’s a corner posts)


The corner notch can be a little tricky. Once you make the first two main cuts and get the bilk of the corner material out of the way, the remaining material can get removed with a chisel, multi-tool, or what ever else you see fit, but it does need to be a nice clean inside corner so it does not throw the post off plumb in either direction.

So, we now have a braced tower, a decked landing, and a few posts in the air….I’m getting closer. Now I get to take this structure from a “tower” to an actual “staircase”. : )
In order to move forward I had to tackle one major hurdle: the stair stringers! Rather than offer a lesson on all of the jargon which describes staircase components, I’ll ask you to simply use the image below as a bit of a guide for what I’m referring to. This image was originally produced by the folks at Swanson Tool Company.

As you might expect the stringers are the real meat and potatoes of any staircase build. If the first one is not done correctly, you will not only have a stair case that looks funny but can also be hard to walk on and potentially unsafe. My advise to you would be to take your time and lay out your staircase stringer on paper first! For short 2-3 step staircases, one could probably stumble on some dimensions that work and no go through the hassle of any math. However, for this build there is simply no way around it.
Fortunately for me, I happen to be married to a math loving mechanical engineer who was happy to handle some number crunching for me. After looking at his work on paper, it looks as though the math is pretty straightforward but it was nice to hand it off and know that I can trust his numbers when it comes time to buy materials. Based on what he came up with, 7-1/2″ for the risers and 10-5/16″ for the treads. These numbers worked perfect for a 2×12 for the treads and a 2×8 for the risers.

I used a Swanson framing square with two brass stair gauges attached to lay out the pattern of the stringer. This part was pretty cool since you are basically setting the square on the edge of the 2×12 where the brass gauges are attached, then just trace out the 90 degree corner of the square. After the first one is done, you simply move down the board a bit and trace out the next one. After it’s all laid out, you can cut out your stairs!


I used a circular saw to make the majority of the first two cuts but left the corner meat for the sawsall. The circular saw is not a good saw for cutting corners in this case since the saw blade has to travel so much farther than the corner in order for the blade to cut where you need it. Because of this, it is best to use a sawsall or a jig saw in the corners.
Once the first stringer is completely cut out, it gets used as a template for the remaining two stringers. This is why it is so important to cut very accurately with the circular saw on the first stringer. Without the first stringer cut as close to perfect as possible, the remaining two will certainly give you trouble when it comes time to put the treads and risers on.
The remaining 2 stringers got cut out and set aside while I figured out the next move on how to hang them. I decided to hang mine using a Simpson angled joist hanger. These hangers are intended for this kind of hanging arrangement and make it easy to set the angled board in position to secure it right where you want it using nails.
Note: When test fitting the stringer to the top plate I realized I had made a bit of an over sight. The top of the stringer gets set level to the top ot the top plate, which makes perfect sense. But because I am working with 2×12 material for the stringers, the mounting face of the stringer is about 12-14 inches tall. Consequently, I decided to hang another 2×8 cross member just underneath my top plate. This will not only offer a bit more rigidity to the structure, but it will also give me some meat to attach the stringer.

I hung the number one stringer in place so that the handrail aligns the entire way up and down the staircase. If you recall from earlier, I sort of “halflapped” the 4×4’s on top of the landing. When it’s all complete, I will have 2 more post which serve as handrail supports attached to the stringer and they will align perfectly to the handrail on the decking.

After the first one was hung in place, the remaining two stringers went up pretty easily. Because I used the angled joist hangers for the stringers, I chose to not install a ledger at the top of the stringers. I did however add in some spacer boards between the three of them to help reinforce the top of the stringer.

Moving down to the opposite end of the stringers, I focused on attaching all of them to the concrete landing. I first made sure they were all running parallel to one another, and also parallel to the building. After squaring them up, I made the final attachment to the concrete.

When I first laid out the stringers I traced out a kick plate like the one you can see in the stair case image above. Now that I had the stringers in place, I slipped in a kick plate and screwed it to the concrete using some concrete anchors. I also gave it a good layer of construction adhesive to help keep it from moving around and then glued and screwed the stringers to the kick plate.
Now it was finally time to start on the treads and the risers! This portion of the build went very fast. Which to me is kind of funny; it seems like there was so much time that went into the planning/layout of the stringer but the execution of the plan takes no time at all! Lol.

I cut all of my risers to the same width of the stringers which was just over 45”. I first started out nailing the treads in with 8d ring shank nails. Even though they were a good size and type, I just really felt like screws were the better choice. So, I stopped while I was ahead, removed the risers and came back with exterior deck screws.

I used a total of 3 screws per stringer on both the risers and the treads making a total of 9 screws per board. I started with the bottom most riser and screwed it in place then attached another riser mid way up the stringers. I did this to help square the stringers up to one another before continuing with the rest of the risers. Afterward, I went back down to attach the second tread, then just carried on all the way up the staircase until all the risers were installed….it’s starting to look like a staircase!


Following the risers I started in on the treads. I totally hit the easy button on the treads and simply went with 2×12 material cut at 48’ for each tread. Basically, I was able to get two treads out of a 96’ board. This leaves me with about 1-1/2” of overhang on each side and about 7/8” of nose length. Once again I used some outdoor rated construction adhesive on the bottom of the treads to keep them from squeaking as time goes by.

You can see that this lumber not only looks incredibly strong but it feels very solid when walking on it too. The treads were probably the quickest step to this entire build…and when they were complete, I couldn’t help but do a little dance up and down the stairs. : )

Now that I have a bon a fide staircase in front of me I needed to put the final touches on it with a nice handrail. Like all the other parts of this build, there are a huge variety of ways to build handrails. I combed through the Internet looking at different design and finally settled on one I thought looks tough, sturdy, and well sorted.
I started the hand rails by attaching two more posts; one at the very bottom of the staircase and one in the middle of the staircase. I left the length of these boards a bit long so I can cut it to length with an angled top after I get father along. On the bottom of these two posts I cut a 45 degree angle off of the outside edge just for a little added aesthetics. The bottom of the post gets bolted to the stringer with two ½” carriage bolts just like the ones on the upper landing.

After both post were attached, I started building out the actual rail with some treated 1×4 material. Rather than measure out the space between the posts and figure the angle for a cut line, I pretty much marked a cut line “on the fly” by holding up a long 1×4 against the post and then tracing the cut line directly. From there I would move my miter saw until the blade matched the angle of the cut line then saw through the material.


I started with the lower board that will support the spindles. This board got attached high enough off the nose of the treads so a 1×4 turned on its 4” side can fit underneath it. I would have attached them all at the same time but I realized that I would not have room to operate my drill in order to screw into the bottom of the spindles.

The upper portion of the rail is handled a bit differently. I first attached the vertically oriented 1×4’s in place (one on the outside and one on the inside but cut them in the same manner mentioned above – held the long board in position with the help of a clamp, then marked the cut line directly. After these two boards are installed, I installed the board that will attach to the top of the spindle. If you can imagine the cross section shape of the upper and lower portion of the handrail, you can see the top is shaped like square “U” and the bottom is like and inverted square “U”.
At this point I could begin installing the spindles. I focused on building out the top of the staircase and get into a rhythm with these spindles before taking off down the staircase.
Anytime you know you are going to have the same takes over and over, it is always a good idea to come up with some sort of template to ensure symmetry in your build. I made a small spacer block as you see here

The 2×4 section serves as the right-to-left spacer and the overlap of the 1×4 material serves as the front-to-back spacer when it gets butted to the railing material. This spacer block saved so much hassle of having to lay out the entire board and try to hold a line while operating a drill at the same time. Basically I would just set the spacer in place and the scoot the spindle into the locating corner, screw in the bottom from the underside, then repeat the same procedure on the top.
Exterior decking screws were used on all of the construction of the handrails. Everything other than the spindles got pre-drilled before screwing to prevent the wood from splitting. The spindles were screwed in through the end grain and are about 2” square so I did not feel it was necessary to pre-drill in that instance.

Just to be safe I checked for level on about every 5 spindles or so. I got into a pretty good groove working on the upper landing before I moved on to the staircase railing, which was a bit more challenging. The spindles on the railing up on the landing are square cut on the ends. The stair case railing spindles have an angled cut to them on the top and bottom. Consequently, positioning them in place can be a bit more challenging.

Nonetheless, the process was still pretty much the same. However I did make a modification to my spacing block. I decided to make an angled cut on the 2×4 portion of my spacing block to match the angle of the spindle. I did this by just adjusting the deck on my circular saw and ripping the corner of the board off. Afterward, the jig worked perfect for the staircase spindles.
Once I got used to holding everything in place before screwing it done, I was able to get into a rhythm and knock out the staircase spindles in about an hour and a half or so. Finally, I attached lower 1×4 on all sides to button up the bottom of the hand rail. At this point I could focus on the last remaining item; the top cap.
Last but certainly not the least was the top cap of the handrail. This portion was very straight forward. The top cap is wider than the handrail so it has a bit of a lip on it which feels nice in your hands. I ran a router over all of the edges so they are smooth to the touch. The cap was centered over the top of the posts and I used the same exterior screws to attach it to the existing lumber I installed earlier

The only real trick to the top cap was angling the cut across the width of the board where the staircase rail meets the landing rail. Fortunately, it’s the same angle that the spindles are cut at so it was really a no- brainer.


Well, I absolutely love it! This build really kicked my butt to be honest. I managed to balance the development of this staircase with travel, sickness, holidays, and the list goes on! Lol Fortunately I feel very good about the results and appreciate you taking the time to go a bit deeper in the details of this tutorial. After a couple of moths pass by and the wood treatment has dried up a little bit, I plan on painting this entire thing. Although I like the wood finish, I think it would look much nicer with a nice paint job. Once again, thank you for your support and I hope you gained something from my experience with this project.
Happy building! – April


