How To Pour A Small Concrete Slab
- Outdoor DIY Projects
- April Wilkerson
- Updated: May 7, 2024
Thinking about pouring your own concrete slab? Check out this easy-ish DIY project where I poured my own little slab, for my upcoming shed build!
I am wanting to build a lean-to right outside of my shop to store my dust collector in. So the first thing I wanted to do was pour a small concrete slab for it to sit on. Back behind my shop there is already a small slab that is roughly 2′ x 2′, but it wasn’t level and had some slight cracks in it. I’ve been wanting to learn how to mix and pour concrete so I thought this project would be the perfect starter.
Now I could have made this just a small 2’x2′ but since I was going through the work I went ahead and made it 6’x4′ so that I’ll have extra room. I’m thinking I’ll store the yard tools in it.

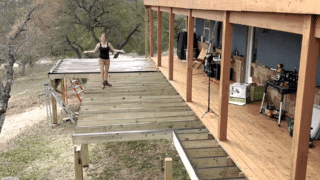
This is a before shot of the area I wanted the slab. As you can see I have a small tree growing as well as the old slab a previous owner put in. I started by chopping down the tree and removing the slab. The slab was easy to remove thankfully. I put a rock bar under one side and it lifted right up. I first went to my shop and grabbed a few scraps to make into stakes.

I cut the ends at 45s with my miter, then hammered these into the corners where I wanted the new slab to be located. I went ahead and mine my the length of this area which is 6′ x 4′. Once the stakes were in the ground I came back with some string and tied it around them so I would have a clearly marked location to dig. With the area marked I started digging. I wanted to go down a total of 5 1/2″ to 6″. I first grabbed a shovel but the ground was just too hard so I moved to using a grubbing hoe. I would break up the dirt a few inches at a time, pretty much just work in a line and chip away a little as I went.


Once I had a good amount of soil loosened up, I came back with a shovel to remove it. This process took around 4 hours and is exhausting work. I would recommend waiting until a semi cool day and also trying to get a friend to help. Try and make sure your corners are nice and defined.

Once the hole was dug I came back and just kinda smoothed the dirt so that it was as even as possible. Next I cut two 2x4s to length using my circular saw then set them in place. These are called the forms. Once I had the lengths cut right I used two screws to screw them together. If your slab has an exposed third or fourth side, you’ll box it all in using forms that are connected the same way. Before moving forward, use a level to make sure the forms are level. Now I came back with more stakes and placed them in the ground about every 2′. I hammered these in about 2″ into the ground. Don’t skip this step because the weight of the concrete will push your forms out if they aren’t supported. Next was to start laying the subsurface. Everything I read said you want a subsurface so that water will be able to free move, and this will prevent a lot of movement in the slab. I used five bags total of All Purpose Sand. I would break the bags open using my shovel, then pour them out and spread it around using my hands, again trying to get it as level as possible. I took a hose and gave it a good watering.
Next was laying out the rebar. I didn’t want to mess with cutting any rebar so instead of buying the 20′ length, I went ahead and purchased four lengths of 4′ rebar, and six lengths of 3′ rebar (both are 3/8″ diameter), then I over lapped them to make up the length needed. You can either do it this way, or you can buy a long joint of rebar and just cut it to the exact length you need.

To lay it out, I first set out a tape measure in the grass and placed my 6′ lengths 17″ apart. Then I came back with the 4′ lengths and spaced them evenly which is roughly about 14″ apart. This will vary depending on how big your slab is, but you want them spaced evenly and no more than 18″ apart.
Once I had them all positioned I came back with some bailing wire and tied together all the joints.

I set the rebar in my pit then place rebar high-chairs on all the ends to hold it up. This allows the rebar to be positioned in the center of the slab (when the concrete is poured) instead of on the bottom. You do not want to leave your rebar laying on the subsurface when you pour your concrete. Alright, now the fun part. : ) Mixing concrete. I went ahead and rented a mixer. It’s cheap compared to how much work it saves you! It took 20 60lb bags to make this slab, and looking back I’m so glad I didn’t have to mix it.
My system was to fill a 5 gallon bucket up half way, then I grabbed a small container that I had laying around. The container doesn’t really matter, I just wanted to use something so that I could get and keep a measuring system down for how much water each batch took. I would add 2 gallons of water to the mixer first then add in two bags of concrete. While that was mixing I would add in a few more containers full of water then add in a third bag. I grabbed my hose and would fill back up my bucket while letting the mixture mix.


You’ll have just play with the ratio of water to concrete. You don’t want it slopping wet but you don’t want it too clumpy and dry either. I recommend starting with less water because you can always add more. Once you get your ratio figured out, then remember it so you can make your following batches the same. After about a minute of letting the batch mix I would dump it into the pit. You’ll want the consistency to where the concrete is wet but it isn’t moving out on it’s own. Now I would dump all my batches from the same spot then just move the concrete around with a hoe or rake. Looking back, I should have lined the area with plywood so that I could dump it from multiple points to make spreading it easier. I should have probably done this when I was setting the forms, but once the concrete was all in I came back with a sawall and cut the stakes to be flush with the 2×4 forms. At this point, my husband and a buddy showed up and I’m so glad they did. I honestly don’t know how I would have done this next step by myself.

Next was to screed the surface. This means to go across the surface of the slab with a 2×4, using a sawing motion. This removes the extra concrete while also filling in the voids. We had to do multiple passes (about 4) to get all the areas filled in. Now let the slab dry some. Everything I read said to wait until the surface lost it’s sheen and I waited for about an hour, which was apparently too long. When I came back to trowel the surface, to make it nice and smooth, it was too dry and hard. : / So learn from my mistake and really keep a close eye on it.


When you come back to trowel I started with a finishing trowel then came back with a hand edger to put a nice finishing touch on the edges. I let it sit over night then removed the forms. I first went around and tapped on the forms with a hammer to kinda break them lose. I stuck a shovel under one end then just lifted it right up. A lot of websites said to leave the forms on for 48 hours, however I removed mine after 24 because the concrete was hard enough to keep it’s shape. So again, just check on your slab and gauge when the forms need to come off depending on how hard/soft it is. It didn’t come out perfect but for my first time working with concrete, I’m happy with the results! This is hard work, but 100% doable if you are motivated to get it done.
Total I spent $140 on concrete, sand, rebar, wood, and trowels. : ) Not bad!
If you liked this project and want to stay up to date with what I’m building, then be sure to sign up for my email newsletter and you’ll get an email when I post something new. See you soon!
*Disclosure: Some links in this email are affiliate links meaning, I may get a commission if you make a purchase. Thanks for your support in this way!


